Part 7: The Final Proof – The Beauty Sleep
Your dough has been mixed, kneaded, fermented, and shaped. It finally looks like a loaf! But before the grand finale in the oven, it needs one last beauty sleep to build up the power it needs for that glorious oven spring. This is the final proof (or “second rise”).
This stage is a delicate balancing act. Under-proof it, and the loaf might be dense or tear wildly in the oven. Over-proof it, and it will have no energy left to rise and will collapse into a flat, sour disc.
The Science Bit: The Final Push
During the final proof, the yeast that was redistributed during shaping gets back to work, producing the final burst of CO2 that will inflate the loaf. The Lactic Acid Bacteria (LAB) also continue to work, further developing the flavor.
Warm vs. Cold: The Decisive Flavor Difference
The choice of proofing method significantly impacts the final result. A warm proof is fast and yields a mild loaf. A long, cold proof in the refrigerator, on the other hand, develops a deeper, more complex acidity and makes the dough firmer and easier to handle—ideal for beginners.
This brings us to the most important decision of this stage: where to let it happen?
1. Room Temperature Proof:
- What: Letting the shaped loaf rest on the counter for 1-3 hours.
- Result: A faster proof. The yeast is very active at warmer temperatures, producing lots of gas quickly. The flavor will be milder and less sour because the LAB don’t have as much time to produce acid.
2. Cold Proof (Retarding):
- What: Placing the shaped loaf in the refrigerator (covered) for 8-24 hours, or even longer.
- Result: This is the secret to deep, complex sourdough flavor. In the cold, the yeast activity slows down dramatically. The LAB, however, are quite happy in the cold and will continue to chug along, producing lots of delicious acetic and lactic acids. This creates a more tangy, interesting, and “sour” loaf.
- Other Benefits: Cold proofing makes the dough firm, which is a massive advantage for beginners. It’s much easier to handle and, most importantly, much easier to score cleanly with a razor. It also adds incredible flexibility to your schedule—you bake when you’re ready, not when the dough is.
For maximum flavor and convenience, we almost always recommend a long, cold proof in the fridge.
How to Do the Final Proof
- Place your shaped loaf, seam-side up, in its well-floured banneton (proofing basket).
- Place the entire banneton inside a plastic bag or cover it with a shower cap. This prevents the dough from drying out.
- For a Cold Proof: Place it in the fridge for at least 8 hours and up to 24.
- For a Room Temp Proof: Leave it on the counter in a warm spot for 1-3 hours.
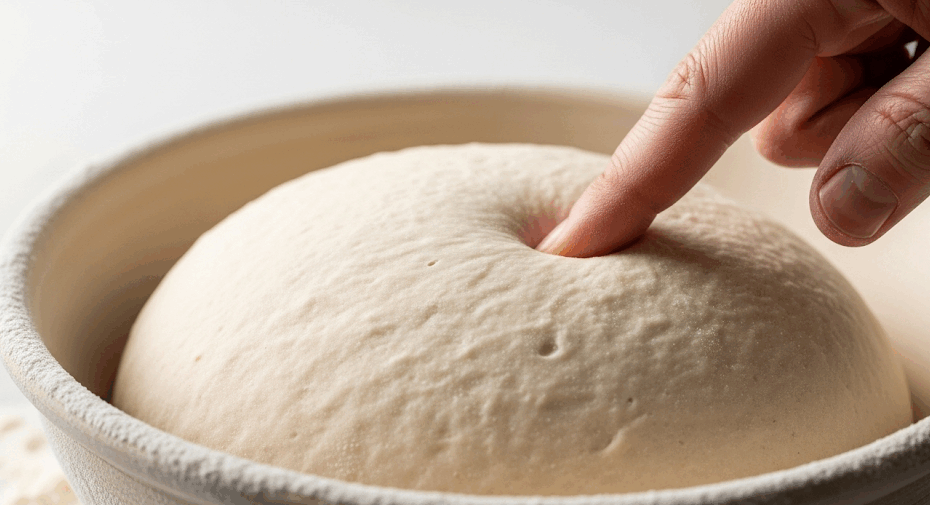
How Do I Know When It’s Ready? The Poke Test
This is the most reliable way to gauge if your dough is ready to bake.
- Lightly flour a finger.
- Gently poke the dough about half an inch deep.
- Observe how the indentation springs back.
- Under-proofed: The indentation springs back immediately and completely disappears. The dough is still too tense and needs more time.
- Perfectly Proofed: The indentation springs back slowly and only partially. It leaves a small dent. The dough is gassy but still has strength. It’s time to bake!
- Over-proofed: The indentation stays completely and doesn’t spring back at all. The structure has weakened and it’s likely to collapse in the oven.Pro Tip – Don’t Panic!: You can still bake it, but expect a flatter, more sour loaf. Alternatively, gently press the dough into an oiled pan, dimple it all over, drizzle with olive oil and sea salt, and bake it as a delicious focaccia!
For a cold-proofed dough, you should bake it straight from the fridge! The intense thermal shock from the cold dough hitting the hot oven helps produce an even more dramatic oven spring.
The final beauty sleep is over. It’s time to preheat your oven and get ready for the most dramatic and rewarding part of the entire process.
Next Up: Part 8: The Grand Finale – Baking Your Loaf →
Or jump directly to your favorite part:
- Pretzel & Rye Beginner’s Guide – Part 1: Taming the Yeast Beast (Your Sourdough Starter)
- Pretzel & Rye Beginner’s Guide – Part 2: The Autolyse – Giving Your Flour a Spa Day
- Pretzel & Rye Beginner’s Guide – Part 3: Mixing & Kneading – The Great Gluten Workout
- Pretzel & Rye Beginner’s Guide – Part 4: Bulk Fermentation – The First Big Rise
- Pretzel & Rye Beginner’s Guide – Part 5: Divide & Conquer – Preshaping Your Dough
- Pretzel & Rye Beginner’s Guide – Part 6: The Final Shape – From Blob to Boule
- Pretzel & Rye Beginner’s Guide – Part 7: The Final Proof – The Beauty Sleep
- Pretzel & Rye Beginner’s Guide – Part 8: The Grand Finale – Baking Your Loaf
- Pretzel & Rye Beginner’s Guide – Part 9: The Afterglow – Storing, Freezing & Reviving Bread